
Hello friends!
I am excited to be doing my final challenge for Level 2 of the Altenew Educator Certification Program. I have really enjoyed all of the level 2 classes and gained so much inspiration from the instructors and fellow participants. And the great thing is that these classes are accessible to anyone and not just part of the AECP program, so I really encourage you to try them out. There are SO many classes to choose from.
For my final project I was asked to create 4 masculine cards with the themes of birthday, love/thinking of you, encouragement and anniversary, using any 3 components from the classes in Level 1 or 2 (I ended up using 5). As well as an altered item/upcycled project.
The components I used for inspiration on my projects include Easy Ink Blending (with Amy Lee), Let It Shine (with Carissa Wiley), For The Guys (with Jennifer Rzasa), Creative Watercolor Media (with Jennifer Rzasa, Laura Bassen & Debby Hughes) and Celebration Stencil Techniques (with Laurel Beard).
So today I will share with you the four cards I made including step by step instructions, as well as my additional upcycled project and I hope they will give you some inspiration! I have also included some highlighted tips that I hope you will find useful in your own crafting.

I have included a full Altenew supply list at the end of this post.
When planning out this project I knew I wanted all of my cards to be cohesive in some way, but rather than choose a single colour palette, I decided instead to draw up a sketch and use that same sketch for all four of my cards. I altered each card by theme and technique and will go through each of them with you.
Tip: Using a sketch helps when mass producing cards, or when you want to create quick cards as it saves you time having to come up with different layout designs for each card.
This is the sketch I drew up and then used for all four of my cards.

CARD 1: ENCOURAGEMENT

For this card I was inspired by the 'Easy Ink Blending' class but stepped it up a little to incorporate an embossing folder. I also used inspiration from the 'For The Guys' (masculine cards) and 'Let It Shine' classes.
I started by ink blending a panel of Bristol card stock with Altenew Dye Inks in Arctic Mountain, Winter Lake and Icy Water using large Altenew ink blending tools going from dark to light, building up the colour. I then put the panel into the Might Waves embossing folder and ran it through my die cutting machine. I cut the panel to a smaller 3.25"x4.25" so that it would fit through the slot in the top of the embossing folder as I wanted to leave the top portion of the panel un-embossed.

Tip: Inking the cardstock first, makes the paper softer giving a beautiful embossed impression as the embossing folder presses the ink into the card.
I then mounted it onto a white panel which was slightly larger. I then used double sided foam tape to attach it to a black A2 top folding card base.
I then stamped the sentiment from the Sentiment Strips stamp set in clear embossing ink, and heat set with pure white embossing powder. I thought this sentiment was perfect for an encouragement card! I then cut it into strips and used foam tape to attach it to the front of my card.
To add a bit of shine to my card, I attached some clear droplets to the embossed panel which completed my card.

CARD 2: THINKING OF YOU

For my second card I have incorporated the 'Creative Watercolor Media', 'Let It Shine' and 'For The Guys' classes. I am just disappointed that you cannot capture the beautiful metallic watercolours in a photo, to see how gorgeous they look in reality!
I started by stamping the Whimsical Herringbone background stamp (inspired by the Geometric class in 'For The Guys') onto black watercolor cardstock in clear embossing ink and heat set with pure white embossing powder. I then coloured the ink with the gorgeous Altenew Metallic Watercolour paints using the Altenew Size 3 round paintbrush, and put it aside to dry. The colours I used were Topaz, Sterling Silver, Aquamarine and Jade.

I also painted a piece of the watercolour paper with the Topaz metallic paint, and when it was dry I die cut the Hello from the Hugs & Hello set and mounted it onto the shadow panel which was cut from black cardstock.

Tip: Choose only 3-4 coordinating colours only to keep the card cohesive and less 'busy' looking.
I trimmed the background panel to 3.25"x4.5", attached it to a white panel and used double sided foam tape to attach it to a black A2 top folding card base. I then added the hello word die to the front, stamped the 'thinking of you friend' sentiment from the Hugs & Hello stamp set in clear ink and heat set that in pure white embossing powder as well before cutting it into a strip and mounting it over the Hello using double sided foam tape.
As this card is already so shiny due to the metallic watercolours, I decided not to add any further embellishment.

CARD 3: BIRTHDAY
This card incorporates the Stencil techniques class as well as the For The Guys (making a masculine themed card), and Let it Shine.
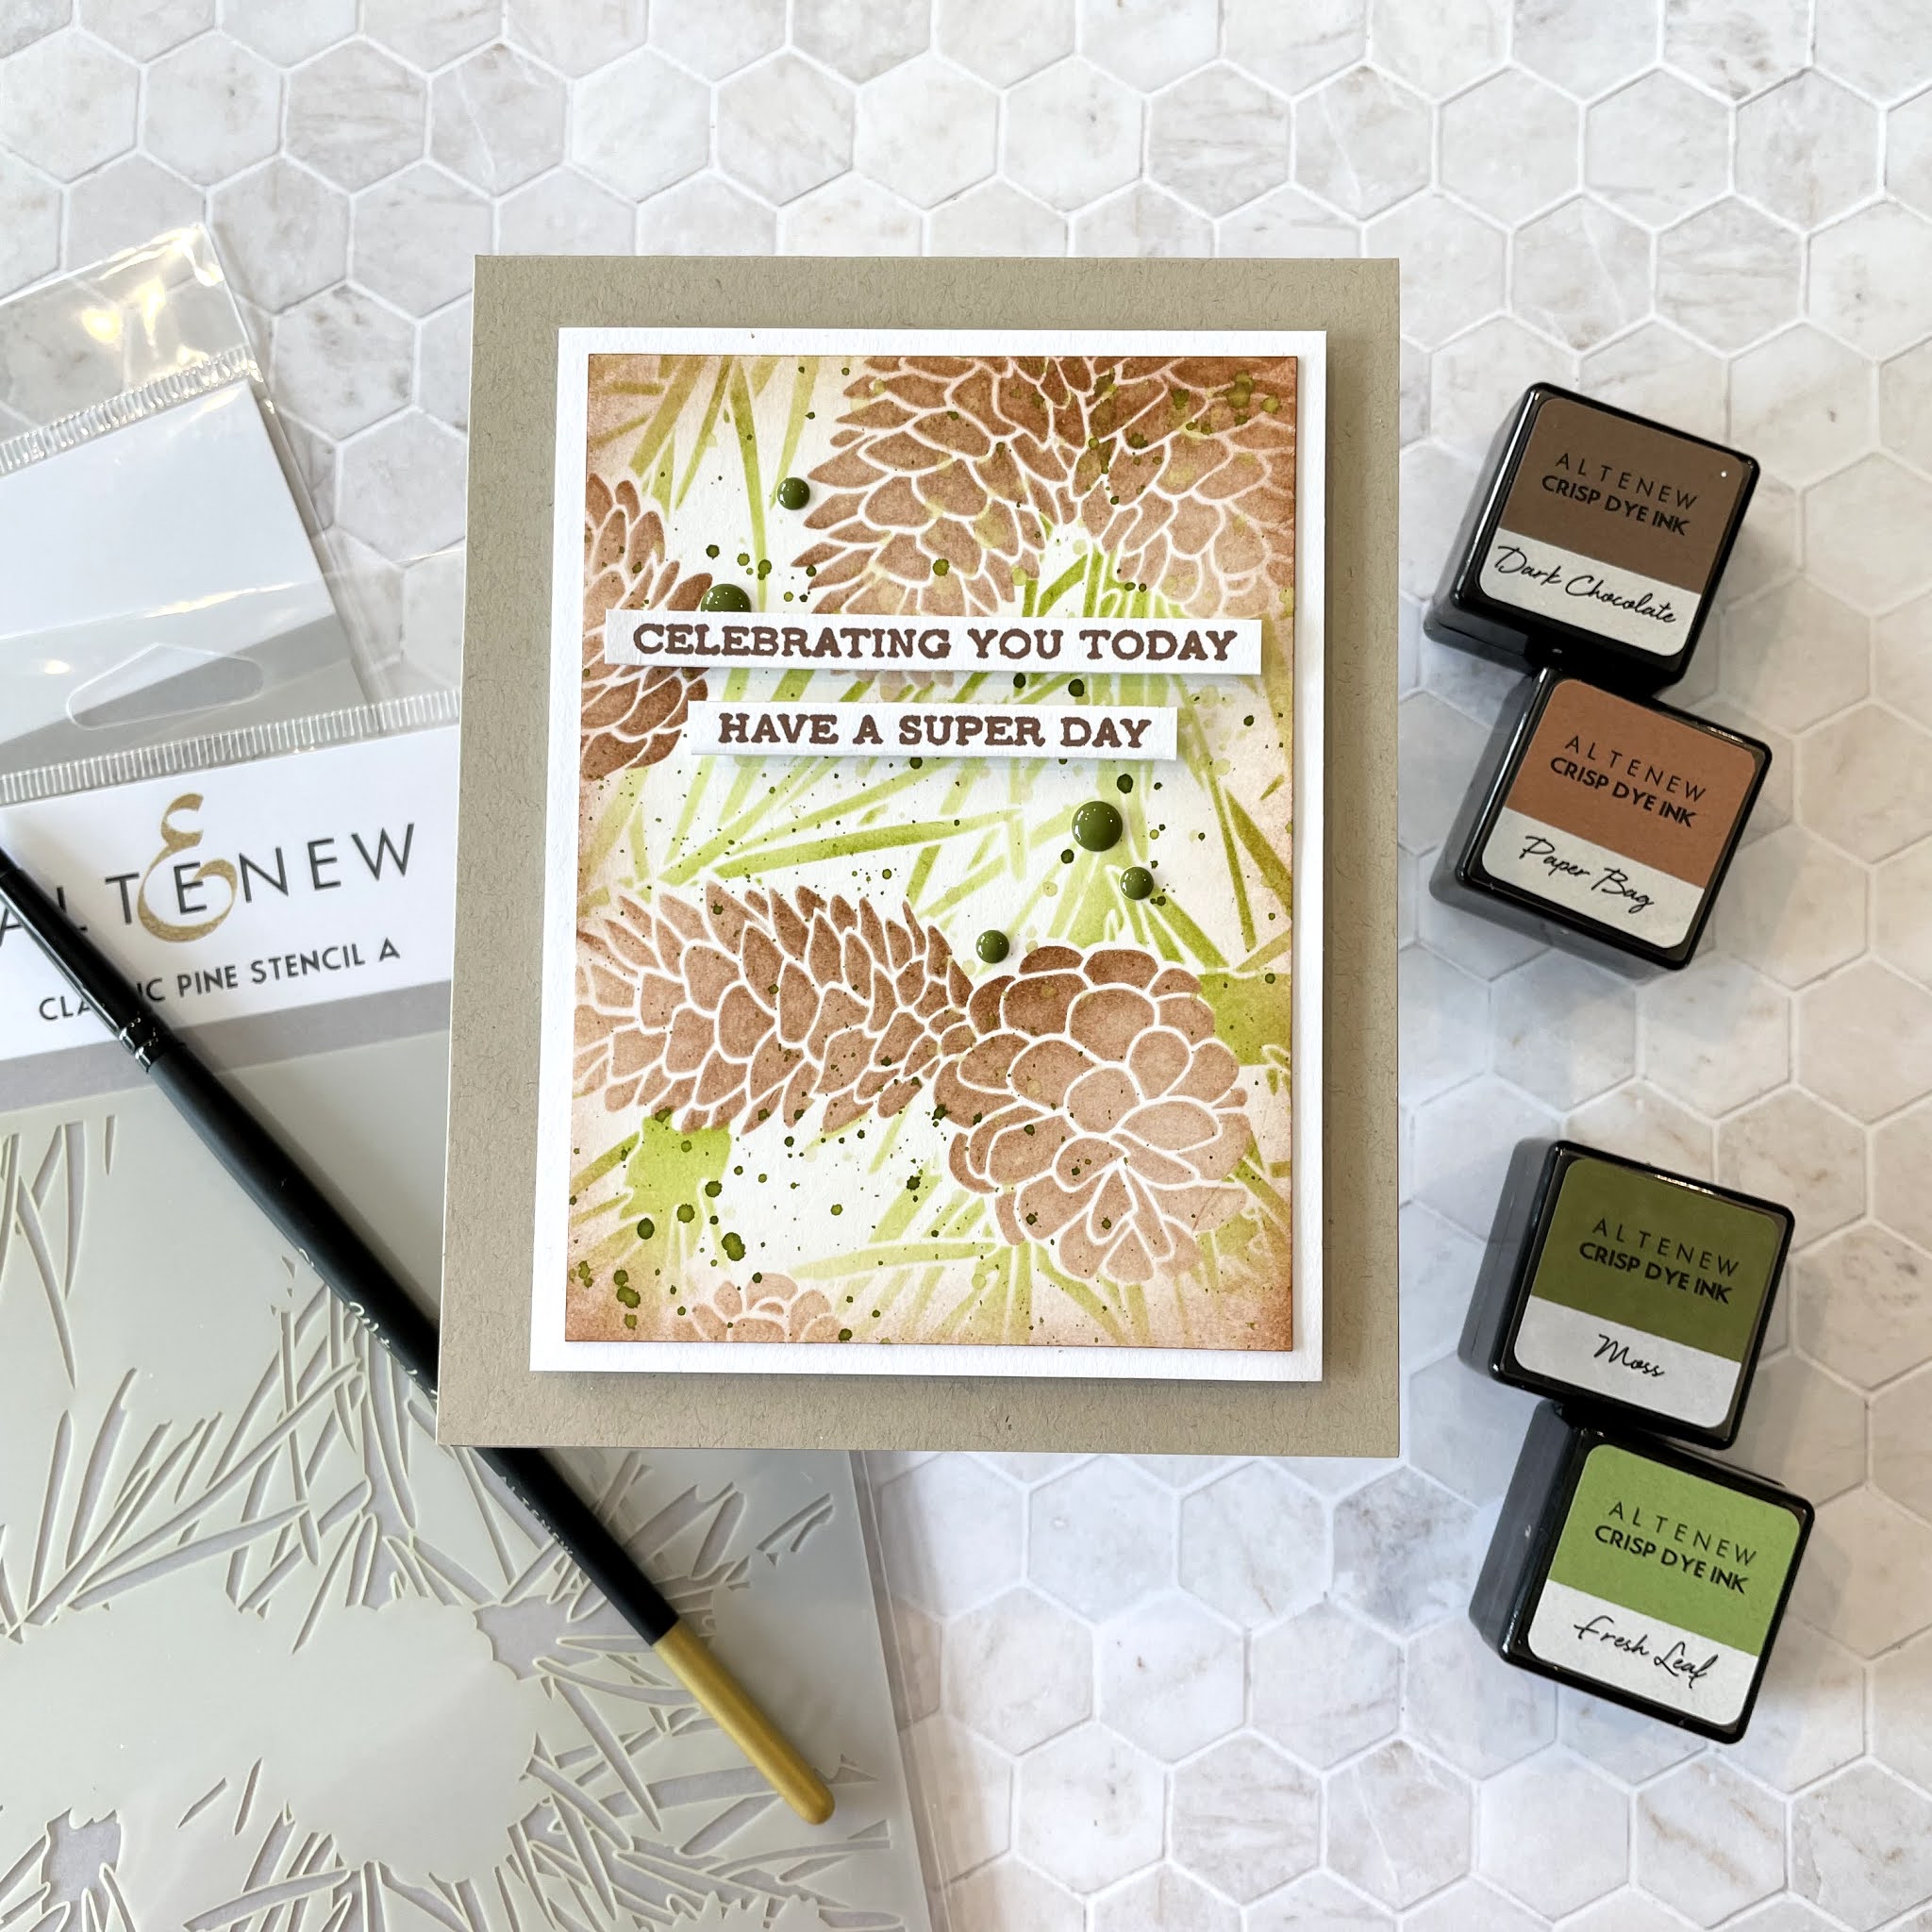
For this card I started with a panel of Neenah white cardstock and inked up the leaves of the gorgeous Classic Pine Stencil set in Altenew Fresh Leaf and Moss inks, before stencilling the pine cones in Paper Bag & Dark Chocolate inks.

Tip: Look at your stencils to see if they can be used for different themes or seasons. Although this stencil may look more Christmas/Winter themed, it is perfect for masculine cards and can be used year round!
I then trimmed the panel down to 3.25"x4.5" and inked around the edges using the Paper Bag and Dark Chocolate ink for a more dramatic look, and added some ink splatters with the Moss ink before adding it to a slightly larger white card panel, and used double sided foam tape to attach it to a Neenah Desert Storm A2 top folding base.
I stamped the sentiment from the Sentiment Strips 2 stamp set in Dark Chocolate ink onto Neenah white card stock and cut into strips before attaching it to the front of my card using foam tape. To complete the card and add some shine, I used the enamel dots from the Tropical Forest set.

CARD 4: ANNIVERSARY

For my final card I have been inspired by the 'For The Guys', 'Let It Shine' and 'Stencil Techniques' classes.
I chose to use the fun cup from the 'Friends Forever' stamp set for this card and was originally going to colour it with my Altenew markers, but then decided I really wanted to put a pattern on it instead. I first looking though my background and patterned stamps before choosing the 'Feeling Dotty' stencil and I love how it turned out!
I started by stamping the cup image twice on white Neenah card stock in permanent black ink. On the first image I used the stencil to add the dotty pattern to my cup. I first stencilled the dots in Caribbean Sky ink, before shifting the stencil over a little and adding the Arctic Mountain ink using the small ink blending tools (perfect for stencils!) and then fussy cut it out.
On the second cup I added some shading to the lid and cup band with Altenew Artist Markers (in TG02 & TG03). I stamped the 'U & Me' sentiment from the same stamp set on the band using the Arctic Mountain ink. I then fussy cut both pieces. I also stamped the straws in permanent black ink and added shading using the same markers before cutting them out and attaching all of the pieces together.

I stamped the heart from the same stamp set in black ink and coloured it with the R318 Altenew Artist marker to bring a pop of colour to the cup, and added some glossy accents to add shine. I attached it to the cup using double sided foam tape.

Tip: I inked around the edge of a piece of Neenah card stock using the Arctic Mountain ink rather than use a navy card stock. This ensures that my mat will coordinate perfectly with my image and background.
I was going to place my panel onto a plain card base, but decided to follow the dotted pattern into the background and used the same stencil technique as above on my card base before attaching my completed panel to complete my card. I thought this was really effective in tying my image to my background.

UPCYCLED PROJECT
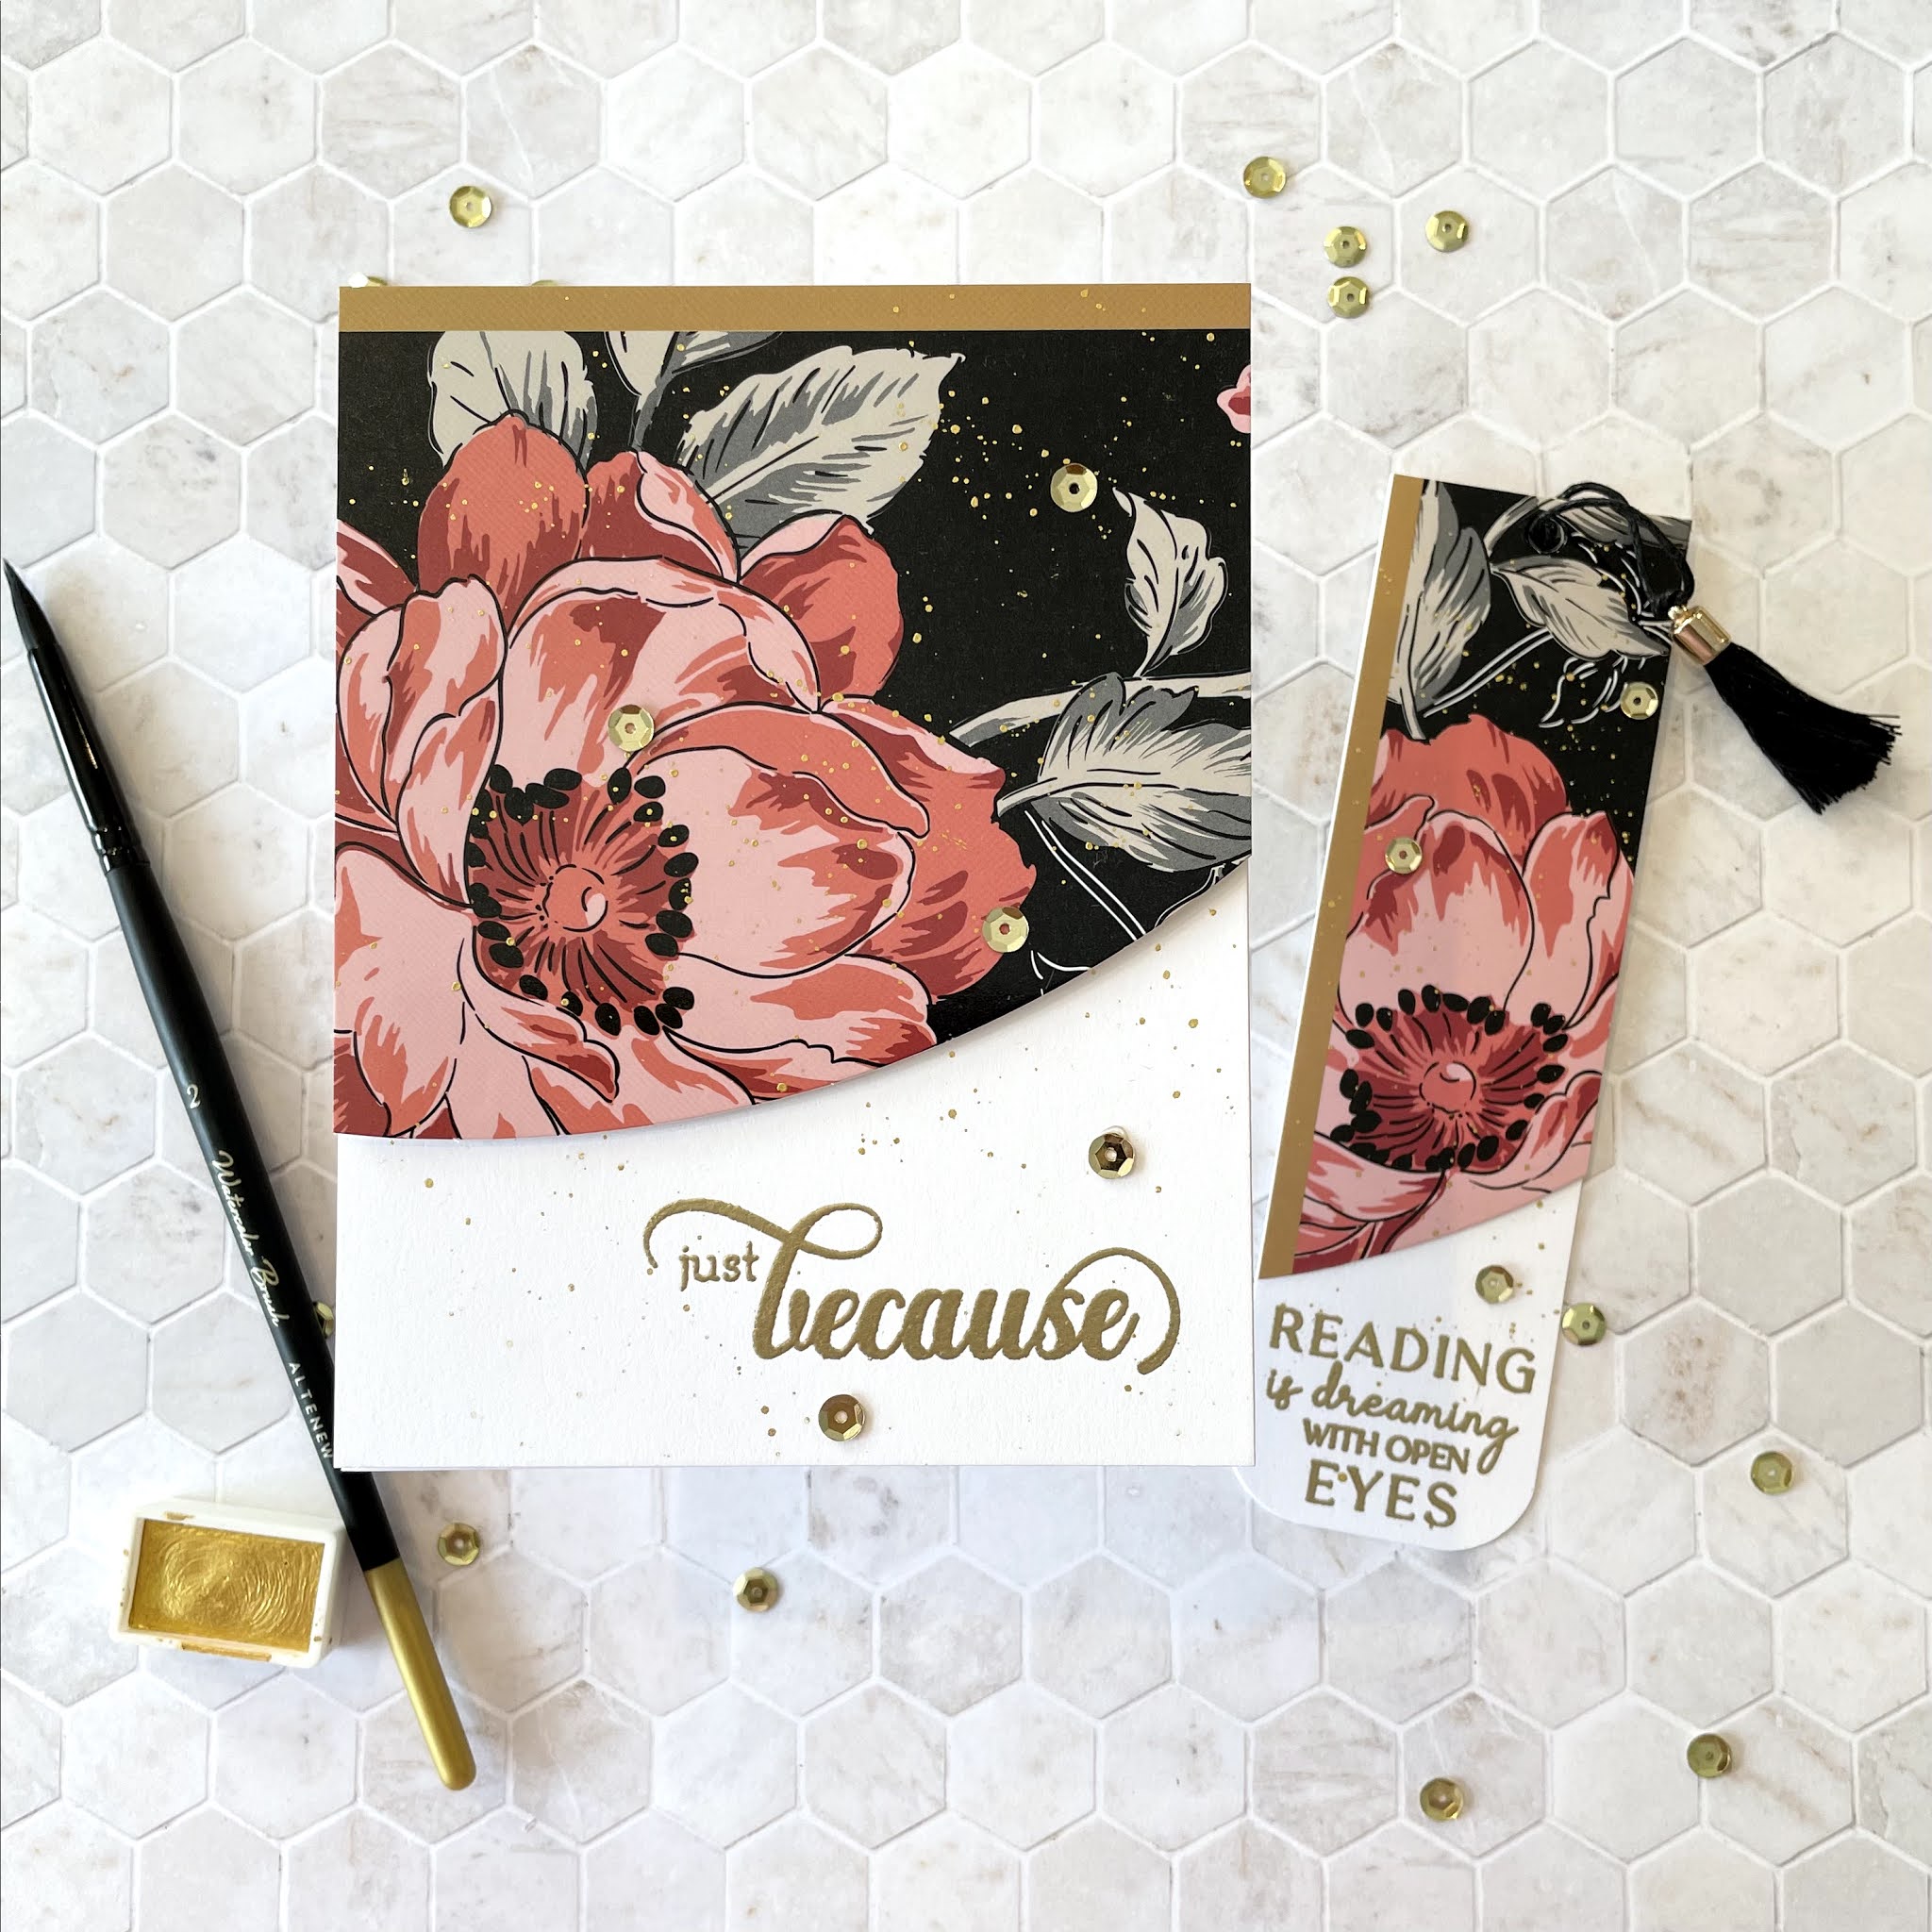
A couple of months ago I purchased the large roll of Altenew double sided tape (I love this stuff!) and the packaging was so gorgeous that I couldn't part with it so I put it aside. And I'm so glad I kept it, because it turned out to be perfect item to upcycle for this project! which was also inspired by the 'Let It shine' class.

I decided to create a coordinating card and bookmark for my project using the up cycled packaging. I am going to send this set to a dear friend who is having a rough time at the moment and I hope it will cheer her up a little.
I first created the card by cutting a piece of the circular packaging to fit on the top of a white A2 card base which I attached using double sided tape. I made sure to incorporate the gold strip on the packaging for some shine. And to follow through with the gold, I stamped the sentiment from the Fancy Greetings stamp set using clear embossing powder and heat setting with antique gold embossing powder. I then added some splatters using the gold paint from the Metallic watercolor set using the Altenew #3 round brush. I still felt it needed a little more shine, so I added some gold sequins to complete the card.


For the bookmark I cut a piece of white Neenah cardstock to 6"x1.75". I cut a piece of the packaging to fit over the top of the bookmark, again incorporating the gold strip and attached it with double sided foam tape, being sure to leave enough room at the bottom for my sentiment.
I stamped the sentiment from the 'Tall Tale' stamp set using clear embossing ink and heat set with antique gold embossing powder. I again added gold splatter using the metallic watercolor set, as well as some gold sequins. I punched a whole in the top of the bookmark and added a tassle from my stash and also used a corner rounder punch on the bottom of the bookmark.
I really love the dramatic look of this packaging with the black background and it makes for a very eye catching project. The great thing is, I have enough left for even more projects!


Thank you for taking the time to look at my projects, and I really hope they have given you a little inspiration! I certainly had fun creating them, and am looking forward being inspired even further when I complete the classes I choose for level 3!
Altenew Product Supply List
6 comments:
Jodene, you have done such an amazing job! BRAVO! You rocked the challenge! I love how you saved the gorgeous packaging. I love it too and use it as a decoration piece in my studio! LOL, You have done a fabulous job! All your cards look fantastic. Top job! Thank you for submitting your fantastic work to the AECP assignment gallery.
Gorgeous card and bookmark,🧡 u did an amazing work I love how u used the saved packaging, I save them too ..I learn as the years pass by to save certain things that have a very special use to create something amazing and beautiful n make someone smile whit a happy mail 😘💞
STUNNING projects Jodene! The step-by-step photos are perfect, as well as the final presentations.... just the right amount of supplies showcased to tell the story in one photo. Well Done! I look forward to seeing your Altenew creations in the future :)
Your cards and project were stunning (or maybe is should say handsome). I particularly liked your thinking of you card. I’ll have to try that technique. Thanks for sharing. I too recently finished Level 2 and am working on Level 3. Http://lauriepatterson.com
So happy to have discovered your site. The upcycled card and bookmark are so lovely! You've inspired me to try something like this. tfs-stay well
Stunning collection of cards. The use of the packaging from the adhesive roll is genius. Will lift your idea about creating a sketch template.
Thank you for your beautiful inspiration
Post a Comment